While that certainly works, it means there's a lot of code to be written if i wanted to make them interactive. Say, if I wanted to make them movable I'd have to scan every object in my list and check to see if my mouse point was within the bounds of the control. I'd also have to implement sort orders to make sure that I was only getting the top most item. This is certainly possible (and sometimes even fun!) but you might be thinking to yourself, "Waaaaaaaaitaminute, hasn't someone already done this for me?"
Well, if you were, you're absolutely right! Microsoft has provided us the Control Class that we can inherit from and get a lot of this functionality by default, we just need to implement what we want. Then we can create an object and throw it into the Controls list of anything that has one.
The example I'm going to go through here is creating a custom control called a NamedContainer, which will draw what appears to be a window and will allow the user to move and resize it. You will be able to specify the title text and the colour of the title bar.
Ok, lets get started. First thing's first, create a new VS Windows Forms project and put a panel on your form. I also like to set the background colour to pink so that I can differentiate it more easily from the form. Make your form fairly large and make sure your panel's anchors are set such that it will resize with the form.
Now lets get to the meat of things. Lets create our named container class.
Expand|Select|Wrap|Line Numbers
- public class NamedContainer : Control
- {
- }
Expand|Select|Wrap|Line Numbers
- protected override void OnPaint(PaintEventArgs e)
- {
- Graphics g = e.Graphics;
- // Draw Background
- g.FillRectangle(new SolidBrush(this.BackColor), this.ClientRectangle);
- base.OnPaint(e);
- // Draw Border
- g.DrawRectangle(Pens.Black, this.ClientRectangle.X, this.ClientRectangle.Y, this.ClientRectangle.Width - 1, this.ClientRectangle.Height - 1);
- }
Now you can add the following code to your form's constructor...
Expand|Select|Wrap|Line Numbers
- NamedContainer c = new NamedContainer();
- c.Location = new Point(50, 50);
- c.Size = new Size(300, 150);
- panel1.Controls.Add(c);

Sweet, we've got a rectangle! Lets do something a little more exciting with it, shall we? I mentioned wanting to draw a title bar and making it look like a window. Lets go ahead and do that, but first lets make a few properties so that we can easily get the size of our title bar and the colour of it.
Expand|Select|Wrap|Line Numbers
- [Browsable(false)]
- public Rectangle TitleBarRectangle
- {
- get { return new Rectangle(this.ClientRectangle.X, this.ClientRectangle.Y, this.ClientRectangle.Width, (int)(this.Font.Height * 1.25)); }
- }
- [Category("Appearance")]
- public Color TitleBarColor { get; set; }
We can now add code to the OnPaint to draw the title bar by drawing a filled rectangle on our TitleBarRectangle, and drawing the text centered inside the TitleBarRectangle. Put this directly after drawing the background.
Expand|Select|Wrap|Line Numbers
- // Draw Titlebar
- g.FillRectangle(new SolidBrush(this.TitleBarColor), this.TitleBarRectangle);
- g.DrawString(this.Text, this.Font, new SolidBrush(this.ForeColor), new Point(this.ClientRectangle.X + (int)(this.ClientRectangle.Width / 2 - g.MeasureString(this.Text, this.Font).Width / 2), this.ClientRectangle.Y + this.TitleBarRectangle.Height / 2 - this.Font.Height / 2));
Expand|Select|Wrap|Line Numbers
- g.DrawLine(Pens.Black, new Point(this.ClientRectangle.X, this.TitleBarRectangle.Bottom), new Point(this.TitleBarRectangle.Right, this.TitleBarRectangle.Bottom));
Expand|Select|Wrap|Line Numbers
- public NamedContainer()
- :base()
- {
- this.DoubleBuffered = true;
- this.Size = new Size(300, 150);
- this.TitleBarColor = SystemColors.ActiveCaption;
- this.ForeColor = SystemColors.ActiveCaptionText;
- }
Lets also update the code to create our object...
Expand|Select|Wrap|Line Numbers
- NamedContainer c = new NamedContainer();
- c.Location = new Point(50, 50);
- c.Size = new Size(300, 150);
- c.Text = "Our Named Container!";
- c.BackColor = Color.White;
- panel1.Controls.Add(c);
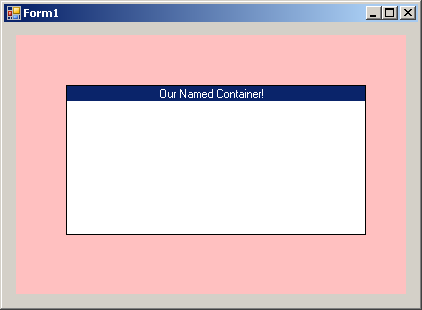
Oh hey, we're recreating Windows 3.1!
Up until now, all we've done we really could have done with the same methods we used in the object scaling example, so lets start doing something a little more exciting. I mentioned moving and resizing, so lets start with moving. To start, lets make an enumeration that we'll use to tell how we are moving our form.
Expand|Select|Wrap|Line Numbers
- private enum MoveMode
- {
- NotMoving,
- Form,
- ResizeBoth
- }
Expand|Select|Wrap|Line Numbers
- private Point? m_clickLoc = null;
- private MoveMode m_moveMode = MoveMode.NotMoving;
Expand|Select|Wrap|Line Numbers
- [Category("Behavior"), DefaultValue(true)]
- public bool Movable { get; set; }
Expand|Select|Wrap|Line Numbers
- this.Movable = true;
- Check to see if we are allowing our control to move.
- Check to see if the left mouse button is pressed (as I've decided to say it's the left button that controls these things).
- If our last click location doesn't exist, check to see if the mouse cursor is in a place where it can move things.
- If it is, set the move mode (and update the last click location).
- Now check if we're moving.
- Check how we're moving and take the appropriate action.
- If a mouse button isn't down, update the Control's cursor to reflect what it's hovering over.
So in writing the code for this...
Expand|Select|Wrap|Line Numbers
- protected override void OnMouseMove(MouseEventArgs e)
- {
- // We only want stuff to happen if we say it can.
- if (this.Movable)
- {
- if (e.Button == MouseButtons.Left)
- {
- // Figure out what we're doing... if it's something, we want to store the last click location.
- if (m_clickLoc == null)
- {
- if (this.TitleBarRectangle.Contains(e.Location))
- m_moveMode = MoveMode.Form;
- else
- m_moveMode = MoveMode.NotMoving;
- if (m_moveMode != MoveMode.NotMoving)
- m_clickLoc = new Point(e.X, e.Y);
- }
- // If we're not, not moving, figure out what we should be doing! (oooh poetry)
- if (m_moveMode != MoveMode.NotMoving)
- {
- switch (m_moveMode)
- {
- case MoveMode.Form:
- // Just moving, update the form's location
- this.Location = new Point(this.Location.X + e.X - m_clickLoc.Value.X, this.Location.Y + e.Y - m_clickLoc.Value.Y);
- break;
- }
- }
- }
- else
- {
- // No desired button pressed lets clear all our states
- m_moveMode = MoveMode.NotMoving;
- m_clickLoc = null;
- // Update the cursor based on what it moved over
- if (this.TitleBarRectangle.Contains(e.Location))
- this.Cursor = Cursors.SizeAll;
- else
- this.Cursor = Cursors.Default;
- }
- }
- base.OnMouseMove(e);
- }
Once you're done that, we can add support for resizing. First, we're going to have to draw a resize control on our forum, so lets add a property to define where that will be. I've decided it should be in the bottom right of the control and will be about 15x15 pixels.
Expand|Select|Wrap|Line Numbers
- [Browsable(false)]
- public Rectangle ResizeHandleRectangle
- {
- get { return new Rectangle(this.ClientRectangle.Width - 15, this.ClientRectangle.Height - 15, 15, 15); }
- }
Expand|Select|Wrap|Line Numbers
- // Draw Resize Anchor if it can be used
- if (this.Movable)
- {
- g.DrawLine(Pens.Black, this.ResizeHandleRectangle.Right - 3, this.ResizeHandleRectangle.Top + 3, this.ResizeHandleRectangle.Left + 3, this.ResizeHandleRectangle.Bottom - 3);
- g.DrawLine(Pens.Black, this.ResizeHandleRectangle.Right - 3, this.ResizeHandleRectangle.Top + 6, this.ResizeHandleRectangle.Left + 6, this.ResizeHandleRectangle.Bottom - 3);
- g.DrawLine(Pens.Black, this.ResizeHandleRectangle.Right - 3, this.ResizeHandleRectangle.Top + 9, this.ResizeHandleRectangle.Left + 9, this.ResizeHandleRectangle.Bottom - 3);
- }
Running the code produces...

Look at that slick little resize handle! Ok, I'll be honest, I blatantly stole it from the one staring me in the face for Visual Studio. Admittedly, theirs is also cooler... you can draw whatever you like, or even use an image if you wish.
Now we need to modify the code so that it supports resizing. We already have the enum code, ResizeBoth (both meaning horizontal and vertical) so we really just need to use it. We're also going to want a way for our form to know what its minimum size is. This is because we don't want to allow the control to resize down to a speck. A reasonably good minimum size might be the width of the text we draw and twice the height of the title bar. That way we should still be able to resize it again to larger if we want. Lets create a private method that will give us a minimum size based on a string and a font.
Expand|Select|Wrap|Line Numbers
- private Size GetMinimumSize(string text, Font font)
- {
- Graphics g = this.CreateGraphics();
- return new Size((int)g.MeasureString(text, font).Width, this.TitleBarRectangle.Height * 2);
- }
Expand|Select|Wrap|Line Numbers
- private Size m_minimumSize;
Expand|Select|Wrap|Line Numbers
- public override string Text
- {
- get
- {
- return base.Text;
- }
- set
- {
- base.Text = value;
- // The minimium size is based on the area the text takes up so we need to recalculate when the text changes.
- m_minimumSize = this.GetMinimumSize(this.Text, this.Font);
- }
- }
- public override Font Font
- {
- get
- {
- return base.Font;
- }
- set
- {
- base.Font = value;
- // The minimium size is based on the area the text takes up so we need to recalculate when the font changes.
- m_minimumSize = this.GetMinimumSize(this.Text, this.Font);
- }
- }
Expand|Select|Wrap|Line Numbers
- if (m_clickLoc == null)
- {
- if (this.TitleBarRectangle.Contains(e.Location))
- m_moveMode = MoveMode.Form;
- else if (this.ResizeHandleRectangle.Contains(e.Location))
- m_moveMode = MoveMode.ResizeBoth;
- else
- m_moveMode = MoveMode.NotMoving;
- if (m_moveMode != MoveMode.NotMoving)
- m_clickLoc = new Point(e.X, e.Y);
- }
Expand|Select|Wrap|Line Numbers
- case MoveMode.ResizeBoth:
- Size newSize = new Size(this.Size.Width + e.X - m_clickLoc.Value.X, this.Size.Height + e.Y - m_clickLoc.Value.Y);
- bool needsRedraw = false;
- // Handle width and heigh resizing separately so that when we hit the minimum size for one, we can still resize the other.
- // Also, only allow sizing if the particular dimension of the new size is greater than the corresponding minimum.
- // Finally, if we do a resize, we need to force a redraw and update the click location so we always resize based on a delta movement.
- if (newSize.Width > m_minimumSize.Width)
- {
- this.Size = new Size(newSize.Width, this.Size.Height);
- m_clickLoc = new Point(e.X, m_clickLoc.Value.Y);
- needsRedraw = true;
- }
- if (newSize.Height > m_minimumSize.Height)
- {
- this.Size = new Size(this.Size.Width, newSize.Height);
- m_clickLoc = new Point(m_clickLoc.Value.X, e.Y);
- needsRedraw = true;
- }
- if (needsRedraw)
- this.Invalidate();
- break;
Expand|Select|Wrap|Line Numbers
- if (this.TitleBarRectangle.Contains(e.Location))
- this.Cursor = Cursors.SizeAll;
- else if (this.ResizeHandleRectangle.Contains(e.Location))
- this.Cursor = Cursors.SizeNWSE;
- else
- this.Cursor = Cursors.Default;
At this point we can also demonstrate a nifty feature of a Control object, which is that it can contain other controls. Since our container is inheriting from a Control, we can throw a button in there, just for fun. Lets update our main form constructor code to the following...
Expand|Select|Wrap|Line Numbers
- NamedContainer c = new NamedContainer();
- c.Location = new Point(50, 50);
- c.Size = new Size(300, 150);
- c.Text = "Our Named Container!";
- c.BackColor = Color.White;
- panel1.Controls.Add(c);
- Button b = new Button();
- b.ForeColor = Color.Black;
- b.BackColor = SystemColors.Control;
- b.Font = this.Font;
- b.Text = "Click!";
- b.Location = new Point(12, c.TitleBarRectangle.Bottom + 12);
- c.Controls.Add(b);

Note that you can drag the control around and it will update the position of the button as well. This is because all client controls for a control draw themselves relative to their parent. Whoo!
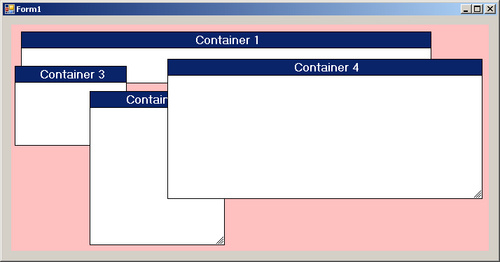
At this point we're basically done; however, for the sake of fun and testing, and to demonstrate yet another advantage to inheriting from control, lets enhance our main class. We're going to make it so that right-clicking on the panel will add a control, middle clicking will remove a control, and left clicking will bring it to the front.
To start though, lets add a constructor overload to our NamedContainer class to more easily facilitate this process.
Expand|Select|Wrap|Line Numbers
- public NamedContainer(string text, int x, int y, int width, int height)
- : this()
- {
- this.Text = text;
- this.Location = new Point(x, y);
- this.Size = new Size(width, height);
- }
Expand|Select|Wrap|Line Numbers
- private void panel1_MouseClick(object sender, MouseEventArgs e)
- {
- switch (e.Button)
- {
- case MouseButtons.Right:
- NamedContainer c = new NamedContainer("Container " + (panel1.Controls.Count + 1).ToString(), e.X, e.Y, 450, 200);
- c.MouseDown += new MouseEventHandler(c_MouseDown);
- c.Font = new Font(c.Font.Name, 12f, FontStyle.Bold);
- c.BackColor = Color.White;
- panel1.Controls.Add(c);
- c.BringToFront();
- break;
- }
- }
Expand|Select|Wrap|Line Numbers
- void c_MouseDown(object sender, MouseEventArgs e)
- {
- if (sender is NamedContainer)
- {
- ((NamedContainer)sender).BringToFront();
- if (e.Button == MouseButtons.Middle)
- {
- panel1.Controls.Remove((NamedContainer)sender);
- }
- }
- }
Now run the project. Right-clicking on the panel will create containers, middle clicking will remove them. You can also move and resize the panels as desired. A much more complete and fun test.
At this point, I'll leave it up to you to experiment with this and/or adding new features. One feature to add might be the ability to resize by clicking and dragging at the edges of the control, similar to how you can do with a windows form.
Enjoy!
----------------------------------------------
What follows is the complete code for Form1.cs in my Visual Studio project. This is only the code part of the partial class as I didn't feel it was necessary to include an entire working project. It's generally also desirable to put your control into another source file, potentially another class library. I just put it at the bottom of my Form class in Form1.cs for simplicity.
Expand|Select|Wrap|Line Numbers
- using System;
- using System.Collections.Generic;
- using System.ComponentModel;
- using System.Data;
- using System.Drawing;
- using System.Linq;
- using System.Text;
- using System.Windows.Forms;
- namespace WindowsFormsApplication1
- {
- public partial class Form1 : Form
- {
- public Form1()
- {
- InitializeComponent();
- //NamedContainer c = new NamedContainer();
- //c.Location = new Point(50, 50);
- //c.Size = new Size(300, 150);
- //c.Text = "Our Named Container!";
- //c.BackColor = Color.White;
- //panel1.Controls.Add(c);
- //Button b = new Button();
- //b.ForeColor = Color.Black;
- //b.BackColor = SystemColors.Control;
- //b.Font = this.Font;
- //b.Text = "Click!";
- //b.Location = new Point(12, c.TitleBarRectangle.Bottom + 12);
- //c.Controls.Add(b);
- }
- private void panel1_MouseClick(object sender, MouseEventArgs e)
- {
- switch (e.Button)
- {
- case MouseButtons.Right:
- NamedContainer c = new NamedContainer("Container " + (panel1.Controls.Count + 1).ToString(), e.X, e.Y, 450, 200);
- c.MouseDown += new MouseEventHandler(c_MouseDown);
- c.Font = new Font(c.Font.Name, 12f, FontStyle.Bold);
- c.BackColor = Color.White;
- panel1.Controls.Add(c);
- c.BringToFront();
- break;
- }
- }
- void c_MouseDown(object sender, MouseEventArgs e)
- {
- if (sender is NamedContainer)
- {
- ((NamedContainer)sender).BringToFront();
- if (e.Button == MouseButtons.Middle)
- {
- panel1.Controls.Remove((NamedContainer)sender);
- }
- }
- }
- }
- public class NamedContainer : Control
- {
- #region Enumerations
- /// <summary>
- /// How is this object currently moving?
- /// </summary>
- private enum MoveMode
- {
- NotMoving,
- Form,
- ResizeBoth,
- ResizeVert,
- ResizeHoriz
- }
- #endregion
- #region Private Members
- private Point? m_clickLoc = null;
- private MoveMode m_moveMode = MoveMode.NotMoving;
- private Size m_minimumSize;
- #endregion
- #region Constructors
- /// <summary>
- /// Base constructor
- /// </summary>
- public NamedContainer()
- :base()
- {
- this.DoubleBuffered = true;
- this.Movable = true;
- this.Size = new Size(300, 150);
- this.TitleBarColor = SystemColors.ActiveCaption;
- this.ForeColor = SystemColors.ActiveCaptionText;
- }
- /// <summary>
- /// Constructor
- /// </summary>
- /// <param name="text">The text for this control.</param>
- /// <param name="x">The x coordinate of this control's position.</param>
- /// <param name="y">The y coordinate of this control's position.</param>
- /// <param name="width">This control's width.</param>
- /// <param name="height">This control's height.</param>
- public NamedContainer(string text, int x, int y, int width, int height)
- : this()
- {
- this.Text = text;
- this.Location = new Point(x, y);
- this.Size = new Size(width, height);
- }
- #endregion
- #region Properties
- /// <summary>
- /// Whether or not this control can be moved via the mouse.
- /// </summary>
- [Category("Behavior"), DefaultValue(true)]
- public bool Movable { get; set; }
- /// <summary>
- /// The text for this control.
- /// </summary>
- public override string Text
- {
- get
- {
- return base.Text;
- }
- set
- {
- base.Text = value;
- // The minimium size is based on the area the text takes up so we need to recalculate when the text changes.
- m_minimumSize = this.GetMinimumSize(this.Text, this.Font);
- }
- }
- /// <summary>
- /// The font for this control.
- /// </summary>
- public override Font Font
- {
- get
- {
- return base.Font;
- }
- set
- {
- base.Font = value;
- // The minimium size is based on the area the text takes up so we need to recalculate when the font changes.
- m_minimumSize = this.GetMinimumSize(this.Text, this.Font);
- }
- }
- /// <summary>
- /// The color of the title bar.
- /// </summary>
- [Category("Appearance")]
- public Color TitleBarColor { get; set; }
- /// <summary>
- /// The rectangle area the titlebar encompasses.
- /// </summary>
- [Browsable(false)]
- public Rectangle TitleBarRectangle
- {
- get { return new Rectangle(this.ClientRectangle.X, this.ClientRectangle.Y, this.ClientRectangle.Width, (int)(this.Font.Height * 1.25)); }
- }
- /// <summary>
- /// The rectangle area the resize handle encompasses.
- /// </summary>
- [Browsable(false)]
- public Rectangle ResizeHandleRectangle
- {
- get { return new Rectangle(this.ClientRectangle.Width - 15, this.ClientRectangle.Height - 15, 15, 15); }
- }
- #endregion
- #region Private Methods
- /// <summary>
- /// Calculate the minimum size for this form based on a string and a font.
- /// </summary>
- /// <param name="text">The text.</param>
- /// <param name="font">The font.</param>
- /// <returns>The minimum size this form can be to still display the form properly.</returns>
- private Size GetMinimumSize(string text, Font font)
- {
- Graphics g = this.CreateGraphics();
- return new Size((int)g.MeasureString(text, font).Width, this.TitleBarRectangle.Height * 2);
- }
- #endregion
- #region Overrides
- protected override void OnPaint(PaintEventArgs e)
- {
- Graphics g = e.Graphics;
- // Draw Background
- g.FillRectangle(new SolidBrush(this.BackColor), this.ClientRectangle);
- // Draw Titlebar
- g.FillRectangle(new SolidBrush(this.TitleBarColor), this.TitleBarRectangle);
- g.DrawString(this.Text, this.Font, new SolidBrush(this.ForeColor), new Point(this.ClientRectangle.X + (int)(this.ClientRectangle.Width / 2 - g.MeasureString(this.Text, this.Font).Width / 2), this.ClientRectangle.Y + this.TitleBarRectangle.Height / 2 - this.Font.Height / 2));
- base.OnPaint(e);
- // Draw Resize Anchor if it can be used
- if (this.Movable)
- {
- g.DrawLine(Pens.Black, this.ResizeHandleRectangle.Right - 3, this.ResizeHandleRectangle.Top + 3, this.ResizeHandleRectangle.Left + 3, this.ResizeHandleRectangle.Bottom - 3);
- g.DrawLine(Pens.Black, this.ResizeHandleRectangle.Right - 3, this.ResizeHandleRectangle.Top + 6, this.ResizeHandleRectangle.Left + 6, this.ResizeHandleRectangle.Bottom - 3);
- g.DrawLine(Pens.Black, this.ResizeHandleRectangle.Right - 3, this.ResizeHandleRectangle.Top + 9, this.ResizeHandleRectangle.Left + 9, this.ResizeHandleRectangle.Bottom - 3);
- }
- // Draw Border
- g.DrawRectangle(Pens.Black, this.ClientRectangle.X, this.ClientRectangle.Y, this.ClientRectangle.Width - 1, this.ClientRectangle.Height - 1);
- g.DrawLine(Pens.Black, new Point(this.ClientRectangle.X, this.TitleBarRectangle.Bottom), new Point(this.TitleBarRectangle.Right, this.TitleBarRectangle.Bottom));
- }
- protected override void OnMouseMove(MouseEventArgs e)
- {
- // We only want stuff to happen if we say it can.
- if (this.Movable)
- {
- if (e.Button == MouseButtons.Left)
- {
- // Figure out what we're doing... if it's something, we want to store the last click location.
- if (m_clickLoc == null)
- {
- if (this.TitleBarRectangle.Contains(e.Location))
- m_moveMode = MoveMode.Form;
- else if (this.ResizeHandleRectangle.Contains(e.Location))
- m_moveMode = MoveMode.ResizeBoth;
- else
- m_moveMode = MoveMode.NotMoving;
- if (m_moveMode != MoveMode.NotMoving)
- m_clickLoc = new Point(e.X, e.Y);
- }
- // If we're not, not moving, figure out what we should be doing! (oooh poetry)
- if (m_moveMode != MoveMode.NotMoving)
- {
- switch (m_moveMode)
- {
- case MoveMode.Form:
- // Just moving, update the form's location
- this.Location = new Point(this.Location.X + e.X - m_clickLoc.Value.X, this.Location.Y + e.Y - m_clickLoc.Value.Y);
- break;
- case MoveMode.ResizeBoth:
- Size newSize = new Size(this.Size.Width + e.X - m_clickLoc.Value.X, this.Size.Height + e.Y - m_clickLoc.Value.Y);
- bool needsRedraw = false;
- // Handle width and heigh resizing separately so that when we hit the minimum size for one, we can still resize the other.
- // Also, only allow sizing if the particular dimension of the new size is greater than the corresponding minimum.
- // Finally, if we do a resize, we need to force a redraw and update the click location so we always resize based on a delta movement.
- if (newSize.Width > m_minimumSize.Width)
- {
- this.Size = new Size(newSize.Width, this.Size.Height);
- m_clickLoc = new Point(e.X, m_clickLoc.Value.Y);
- needsRedraw = true;
- }
- if (newSize.Height > m_minimumSize.Height)
- {
- this.Size = new Size(this.Size.Width, newSize.Height);
- m_clickLoc = new Point(m_clickLoc.Value.X, e.Y);
- needsRedraw = true;
- }
- if (needsRedraw)
- this.Invalidate();
- break;
- }
- }
- }
- else
- {
- // No desired button pressed lets clear all our states
- m_moveMode = MoveMode.NotMoving;
- m_clickLoc = null;
- // Update the cursor based on what it moved over
- if (this.TitleBarRectangle.Contains(e.Location))
- this.Cursor = Cursors.SizeAll;
- else if (this.ResizeHandleRectangle.Contains(e.Location))
- this.Cursor = Cursors.SizeNWSE;
- else
- this.Cursor = Cursors.Default;
- }
- }
- base.OnMouseMove(e);
- }
- #endregion
- }
- }