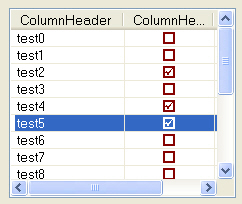
So I developed a simple approach using WingDings. The WingDings font has a checked and unchecked box. In this project I place the unchecked box from WingDings centered in any cell I want a checkbox in, and clicking on the cell will result in toggling between the WingDing checked and unchecked character.
Chr(168) is checked and Chr(254) is unchecked.
(float your mouse over the image below to see the whole thing....)
The trick is to set the font in specific cells to WingDings.
First we have to create a font object:
Expand|Select|Wrap|Line Numbers
- Dim myCheckFont As New System.Drawing.Font("Wingdings", 12, FontStyle.Regular)
Expand|Select|Wrap|Line Numbers
- With ListView1
- For I As Integer = 0 To 15
- .Items.Add("test" & I.ToString)
- .Items(I).UseItemStyleForSubItems = False
- .Items(I).SubItems.Add(Chr(168))
- .Items(I).SubItems.Item(1).ForeColor = Color.DarkRed
- .Items(I).SubItems.Item(1).Font = myCheckFont
- ReDim bOWCheck(I)
- Next I
- End With
Finaly the only thing you then need to manage is to catch the clicks in the particular column and row so you can then toggle between the two WingDing characters that represent the checked and unchecked boxes.
This too is steeped in some esoteric functionality. Why MS didn't give us a simple way to get the cell that was clicked is beyond me - but they didn't so we have to do it the hard way.
In the listview MouseUp event I have the following code
Expand|Select|Wrap|Line Numbers
- Private Sub ListView1_MouseUp(ByVal sender As Object, ByVal e As System.Windows.Forms.MouseEventArgs) Handles ListView1.MouseUp
- Dim cellLoc As MyCell
- cellLoc = WhichCell(ListView1, e.X, e.Y)
- If cellLoc.Col = 2 Then
- If bOWCheck(cellLoc.Row) = True Then
- ListView1.Items(cellLoc.Row).SubItems(cellLoc.Col - 1).Text = Chr(168)
- bOWCheck(cellLoc.Row) = False
- Else
- ListView1.Items(cellLoc.Row).SubItems(cellLoc.Col - 1).Text = Chr(254)
- bOWCheck(cellLoc.Row) = True
- End If
- End If
- End Sub
Expand|Select|Wrap|Line Numbers
- Private Function WhichCell(ByVal lvw As ListView, ByVal X As Integer, ByVal Y As Integer) As MyCell
- Dim colstart As Integer = 0
- Dim colend As Integer = 0
- Dim xCol As Integer
- For xCol = 0 To (ListView1.Columns.Count - 1)
- colend = colend + ListView1.Columns(xCol).Width
- If colstart <= X And X <= colend Then
- WhichCell.Col = xCol + 1
- Exit For
- End If
- colstart = colstart + ListView1.Columns(xCol).Width
- Next
- WhichCell.Row = ListView1.FocusedItem.Index
- Return WhichCell
- End Function
There are possibly several better ways to do this. Improvements are certainly welcome.
I've attached a zip file with a VS2008 VB.NET project you can play with.