Download Source Code:
Softphone-RingGroup-RingOneByOne.zip
Contents
- Importance of the subject
- A little bit more about the technical background of the call centers
- Introduction to the ring group development
- Development / Part 1: Building a softphone
- Development / Part 2: Building additional features
- Development / Part 3: Building the ring group with „one by one” strategy
- Test
- Conclusion
- Further reading and references
Importance of the subject
A call centre or call center is a centralised office used to receive or transmit a large volume of requests by telephone [1]. In other words: „A call center is a physical place where customer and other telephone calls are handled by an organization, usually with some amount of computer automation” [2]. The „usually with some amount of computer automation” part of the previous definition indicates that a successful call center is based on the cooperation of human labor and certain kind of technical equipments. Consequently, the proper IT infrastructure is essential.
According to the experts, the careful selection of employees is the first important step towards a successful call center. But most of the skills can be learned. During first-line support , service desk and helpdesk trainings, the instructors often draw the operators’ attention to the followings:
- Be kind and polite
- Be proactive
- Put first things first – let priorities drive initiatives
- Think win-win – what’s good for your customer is good for you too, etc.
These are very important human factors that are essentially needed for a successful call center. In addition, certain management tools such as performance evaluation and regular feedback to employees, rewards, positive reinforcement, etc. are indispensable elements of an effective call center. But all human knowledge is futile in the absence of appropriate technology. It does not matter whether it is a small call center or a huge one, to gain more profit and build customer loyalty, the staff must use advanced hardware and software equipments.
What is common in an outsourced Indian call center and a huge American call center (Figure 1)? Yes, many things, but the most important one is the core technology. In both places, operators use VoIP desktop phones, softphones, headsets, what's more: advanced PBX systems with typical call center features (e.g. call forwarding, ring group, call recording, call queuing, conference calling, etc.) that makes certain tasks more easy due to the automation.

Figure 1: The technical equipments are key-factors in small and large call centers as well [3]
A little bit more about the technical background of the call centers
A call center has the ability to handle a huge amount of calls at the same time and to forward them to someone who is in charge of handling them. However, in today's accelerated world, VoIP technology, high-performance computers and smart software applications are almost mandatory. Today's call centers use more up-to-date equipment than those old fashioned huge „boxes” with lots of wires hanging out.
We can differentiate two main types of call centers as follows [1]:
- Virtual call center: In this call center model, the operators pay usually a monthly or annual fee to a vendor that hosts the call center telephony equipment in their own data centre. Agents connect to the vendor’s equiment through traditional PSTN telephone lines, or via VoIP (Voice over Internet Protocol).
- Premise-based call center: This model is the opposite of the previous one. In this case the call center has been built in a PBX (Private Branch eXchange) that is owned, hosted and maintained by the call centre operators themselves. This PBX provides advanced functionalities such as call queuing, ACD (Automated Call Distribution), IVR (Interactive Voice Response) or SBR (Skills-Based Routing – this is a call-assigment strategy that is used to assign incoming calls to the most suitable agent, instead of simply choosing the next available agent).
If you use a virtual call center, the features are fixed and you can not expand them indefinitely. But in case of premise-based call centers, you have the opportunity to improve your system by developing the required functionalities. Actually, only the imagination (and the corporate needs and conditions of course) limits this improvement.
Introduction to the ring group development
In this article you will see an example of the latter case. To be precise, this guide demonstrates step-by-step the creation of a ring group. This ring group will be a „virtual” extension installed in your PBX. This extension is based on a softphone (that is – consequently – registered to the PBX). The PBX assigns a telephone number to this extension. When it is called, the extension tries to transfer the incoming call to one of the other extensions (that is to one of the members of the ring group that are has been registered previously to the PBX). The ring group strategy determines that which member will accept the call.
I am afraid, the previous thread contains some new (or scary) expressions… whether so, or not, let me clarify the basic elements of this solution for the sake of completeness.
- What is ring group: In the modern age of telecommunication call routing allows more than one extension to ring when there is an incoming call. It is called ring group. The ring group usually appears as a „virtual extension” in a PBX. During the configuration of the ring group, it can be defined, which telephone extensions belong to the group. This way, when there is an incoming call to the „virtual extension”, all the belonging extensions will ring simultaneously or sequentially within the ring group.
- What does it mean „extension”: In business telephony, a telephone extension may refer to a phone within the internal telephone network attached to a PBX. Within the PBX, the users only need to dial the extension number to reach any other user directly. For inbound calls, after dialing the corporate phone number, a switchboard operator or automated attendant may request the number of the preferred extension . The call can be also completed by direct inbound dialing if outside numbers are assigned to individual extensions [5].
- What is softphone: Softphones are a special kind of computer software, functioning as a virtual telephone, allowing people to communicate with others over the Internet using their PC or laptop.
- What is call transferring: Call transferring is a telecommunication mechanism allowing the user to relocate an existing phone call to another telephone or attendant console, by using a transfer button or a switchhook flash and dialing the required location [6].
- What is ring group strategy: The ring group strategy determines the way how the group members will be notified if there is an incoming call. Before call transferring, the ring group needs to notify the group members that call transferring is needed. To select the member who will accept the call within the ring group, several strategies can be used. Let’s see some examples: It can be configured that all extensions (that is all members’ telephone) in the ring group will be called simultenaously. It can be also implemented that the ring group extension will call the members one by one in a previously set order. An other commonly used strategy is the case when the extensions of the ring group will be called in a randomized order. (In this project the „one by one” strategy will be demonstrated.)
Based on the above, let’s summarize what developments are needed for this project:
- Building a virtual (or console) softphone that is able to receive phone calls
- Building the required additional features such as call transfer and multiple call management
- Building the ring group with „one by one” strategy
Accordingly, I used the following 3 classes:
- Softphone.cs: It presents how to develop a softphone using C# that can be registered to your PBX.
- Program.cs: This class is responsible for handling the user events. It presents how to register the softphone to your PBX.
- RingGroupCallHandler.cs: This class illustrates how to create the necessary ring group strategy. Due to this separated class, the application can handle multiple incoming calls at the same time using its instances.
First and foremost, you will need a new Visual C# Console Application, since this application is actually a „virtual softphone”, so a console application is just enough. For better understanding I divided the rest of this article into 3 main parts. All the three sections present the implementation of one class step-by-step.
Now, that the theoretical and development background is exhausted, „keep calm and start programming!” :)
Development / Part 1: Building a softphone
Are you ready? Sure! :) Well, let’s start by the Softphone.cs class. As a first step, add the required using lines as follows. (As a C#.NET VoIP library, Ozeki VoIP SIP SDK has been used - Please keep in mind that this code has been written by using the prewritten VoIP components of this SDK. So if you want to try them out, you need to install its freely available trial version. [7])
Expand|Select|Wrap|Line Numbers
- using System;
- using Ozeki.VoIP;
- using Ozeki.VoIP.SDK;
Expand|Select|Wrap|Line Numbers
- ISoftPhone _softphone;
- IPhoneLine _phoneLine;
Expand|Select|Wrap|Line Numbers
- public Softphone()
- {
- _softphone = SoftPhoneFactory.CreateSoftPhone(5000, 10000);
- _softphone.IncomingCall += softphone_IncomingCall;
- }
Expand|Select|Wrap|Line Numbers
- public event EventHandler<VoIPEventArgs<IPhoneCall>> IncomigCall;
- public event EventHandler<RegistrationStateChangedArgs> PhoneLineStateChanged;
By using the Register method, you can register the softphone to the PBX. For this purpose a phone line should be created that requires a SIP account. To be able to create a SIP account for your softphone, you need to specify the following parameters:
- registrationRequired: To be able to receive incoming call, you need to set „true” value for this parameter.
- displayName: This is a name to be displayed at the called client.
- userName: This is a number to be dialled by an other client if that want to call this softphone.
- authenticationId: This is an identifier for the PBX (like a login name).
- registerPassword: This is the password belonging to the authenticationId that is used to register to the PBX.
- domainHost: This is a domain name, that is the IP address of the PBX you want to register to.
- domainPort: This is the port number of the PBX you want to register to.
After creating the necessary SIP account, you can create the phone line to be able to communicate with the PBX. It is also required to listen to the changes of the phone line’s state. And finally, the RegisterPhoneLine method can be used to register the phone line to the softphone.
Check out the above-described steps below:
Expand|Select|Wrap|Line Numbers
- public void Register(bool registrationRequired, string displayName, string userName, string authenticationId, string registerPassword, string domainHost, int domainPort)
- {
- try
- {
- var account = new SIPAccount(registrationRequired, displayName, userName, authenticationId, registerPassword, domainHost, domainPort);
- Console.WriteLine("\nCreating SIP account {0}", account);
- _phoneLine = _softphone.CreatePhoneLine(account);
- Console.WriteLine("Phoneline created.");
- _phoneLine.RegistrationStateChanged += _phoneLine_RegistrationStateChanged;
- _softphone.RegisterPhoneLine(_phoneLine);
- }
- catch (Exception ex)
- {
- Console.WriteLine("Error during SIP registration" + ex.ToString());
- }
- }
Expand|Select|Wrap|Line Numbers
- void _phoneLine_RegistrationStateChanged(object sender, RegistrationStateChangedArgs e)
- {
- var handler = PhoneLineStateChanged;
- if (handler != null)
- handler(this, e);
- }
Expand|Select|Wrap|Line Numbers
- void softphone_IncomingCall(object sender, VoIPEventArgs<IPhoneCall> e)
- {
- var handler = IncomigCall;
- if (handler != null)
- handler(this, e);
- }
Expand|Select|Wrap|Line Numbers
- public IPhoneCall CreateCall(string member)
- {
- return _softphone.CreateCallObject(_phoneLine, member);
- }
Development / Part 2: Building additional features
Having done the creation of the softphone, let’s continue the programming with the Program.cs. This class presents the usage of the softphone object, handles the console events, interacts with the user, and uses the opportunities provided by the Softphone class. (You will see that everything are handled in separated methods that communicates with each other.)
Below the Main method can be seen where you need to initialize the softphone by calling an initializer method. (The BlockExit method at the end of the code snippet - it don't let the application to exit.)
Expand|Select|Wrap|Line Numbers
- static List<RingGroupCallHandler> _callHandlers;
- static List<String> _members;
- static int _memberCount;
- static Softphone _softphone;
- static void Main(string[] args)
- {
- _softphone = new Softphone();
- ShowHelp();
- SipAccountInitialization(_softphone);
- _callHandlers = new List<RingGroupCallHandler>();
- _softphone.IncomigCall += softphone_IncomigCall;
- _softphone.PhoneLineStateChanged += softphone_PhoneLineStateChanged;
- BlockExit();
- }
Expand|Select|Wrap|Line Numbers
- static void softphone_PhoneLineStateChanged(object sender, RegistrationStateChangedArgs e)
- {
- Console.WriteLine("Phone line state changed to: {0}", e.State);
- if (e.State == RegState.RegistrationSucceeded)
- MemberAdder();
- }
Expand|Select|Wrap|Line Numbers
- private static void MemberAdder()
- {
- _members = new List<String>();
- while (_memberCount == 0 || _memberCount == null)
- {
- Console.Write("\nThe number of the RingGroup members: ");
- try
- {
- _memberCount = Int32.Parse(Console.ReadLine());
- }
- catch
- {
- Console.WriteLine("Wrong input!");
- }
- }
- for (int i = 0; i < _memberCount; i++)
- {
- Console.Write("{0}. member's phone number: ", i + 1);
- string member = Console.ReadLine();
- _members.Add(member);
- }
- Console.WriteLine("\nWaiting for incoming calls...");
- }
Expand|Select|Wrap|Line Numbers
- static void ShowHelp()
- {
- Console.WriteLine("Hello! This is a brief introduction to this project.");
- Console.WriteLine("This project is about to introduce the creation of a RingGroup (with the one by one strategy), which works on the following way:");
- Console.WriteLine("1., the application asks the user about the number of the RingGroup members");
- Console.WriteLine("2., also asks the user, to enter the members' phone numbers");
- Console.WriteLine("3., waits for an incoming call");
- Console.WriteLine("4., starts to ring the first RingGroup on the list of members");
- Console.WriteLine("5., if the member is busy or cannot be reached, it starts to ring an other member");
- Console.WriteLine("6., if the call is being answered, it transfers the call and stops ringing the other members");
- Console.WriteLine("-------------------------------------------------------------------------------");
- Console.WriteLine();
- }
Expand|Select|Wrap|Line Numbers
- static void softphone_IncomigCall(object sender, VoIPEventArgs<IPhoneCall> e)
- {
- Console.WriteLine("\nIncoming call from \"{0}\"!\n", e.Item.DialInfo.Dialed);
- var callHandler = new RingGroupCallHandler(e.Item, _softphone, _members);
- callHandler.Completed += callHandler_Completed;
- lock (_callHandlers)
- _callHandlers.Add(callHandler);
- callHandler.Start();
- }
Expand|Select|Wrap|Line Numbers
- static void callHandler_Completed(object sender, EventArgs e)
- {
- lock (_callHandlers)
- _callHandlers.Remove((RingGroupCallHandler)sender);
- }
Expand|Select|Wrap|Line Numbers
- static void SipAccountInitialization(Softphone softphone)
- {
- var registrationRequired = true;
- Console.WriteLine("\nPlease set up Your SIP account:\n");
- // Asks, if a registration is required to the PBX. The default value is true.
- Console.Write("Please set if the registration is required (true/false) (default: true): ");
- var regRequired = Read("Registration required", false);
- if (regRequired.ToLower() == "false" || regRequired.ToLower() == "no" ||
- regRequired.ToLower() == "n")
- {
- registrationRequired = false;
- }
- else
- {
- Console.WriteLine("Registration set to required.");
- }
- // The SIP account needs and authentication ID, and some names as well.
- Console.Write("Please set Your authentication ID: ");
- var authenticationId = Read("Authentication ID", true);
- // If the user only presses the Enter button, the username will be the same as the authentication ID
- Console.Write("Please set Your username (default: " + authenticationId + "): ");
- var userName = Read("Username", false);
- if (string.IsNullOrEmpty(userName))
- userName = authenticationId;
- // If the user only presses the Enter button, the display name will be the same as the authentication ID
- Console.Write("Please set Your name to be displayed (default: " + authenticationId + "): ");
- var displayName = Read("Display name", false);
- if (string.IsNullOrEmpty(displayName))
- displayName = authenticationId;
- // The registration password needs to be entered.
- Console.Write("Please set Your registration password: ");
- var registerPassword = Read("Password", true);
- // Domain name as a string, for example an IP adress.
- Console.Write("Please set the domain name: ");
- var domainHost = Read("Domain name", true);
- // Port number with the as 5060 default value.
- Console.Write("Please set the port number (default: 5060): ");
- int domainPort;
- string port = Read("Port", false);
- if (string.IsNullOrEmpty(port))
- {
- domainPort = 5060;
- }
- else
- {
- domainPort = Int32.Parse(port);
- }
- Console.WriteLine("\nCreating SIP account and trying to register...\n");
- softphone.Register(registrationRequired, displayName, userName, authenticationId, registerPassword, domainHost, domainPort);
- }
Expand|Select|Wrap|Line Numbers
- private static string Read(string inputName, bool readWhileEmpty)
- {
- while (true)
- {
- string input = Console.ReadLine();
- if (!readWhileEmpty)
- {
- return input;
- }
- if (!string.IsNullOrEmpty(input))
- {
- return input;
- }
- Console.WriteLine(inputName + " cannot be empty!");
- Console.WriteLine(inputName + ": ");
- }
- }
Expand|Select|Wrap|Line Numbers
- private static void BlockExit()
- {
- while (true)
- {
- Thread.Sleep(10);
- }
- }
Development / Part 3: Building the ring group with „one by one” strategy
Now comes the last major section that demonstrates the implementation of the RingGroupCallHandler class. This class is responsible for waiting for incoming calls, starting to call the member of the ring group based on a preferred ring group strategy, and transferring the call to the appropriate member.
The Start method should be called when there is an incoming call. The Start method accepts the call, then starts to notify the ring group members by calling the StartOutgoingCalls method.
Expand|Select|Wrap|Line Numbers
- IPhoneCall _incomingCall;
- Softphone _softPhone;
- List<IPhoneCall> _calls;
- ist<String> _members;
- object _sync;
- public RingGroupCallHandler(IPhoneCall incomingCall, Softphone softPhone, List<String> members)
- {
- _sync = new object();
- _incomingCall = incomingCall;
- _softPhone = softPhone;
- _members = members;
- _calls = new List<IPhoneCall>();
- }
- public event EventHandler<VoIPEventArgs<CallError>> CallErrorOccured;
- public event EventHandler Completed;
- public void Start()
- {
- _incomingCall.Answer();
- _incomingCall.CallStateChanged += call_CallStateChanged;
- StartOutgoingCalls();
- }
Expand|Select|Wrap|Line Numbers
- void StartOutgoingCalls()
- {
- foreach (var member in _members)
- {
- var call = _softPhone.CreateCall(member);
- call.CallStateChanged += OutgoingCallStateChanged;
- _calls.Add(call);
- }
- CallSequencer();
- }
Expand|Select|Wrap|Line Numbers
- private void CallSequencer()
- {
- if (_calls.Count > 0)
- {
- var call = _calls[0];
- Console.WriteLine("Ringing phone number \"{0}\"", call.DialInfo.Dialed);
- call.Start();
- }
- else
- {
- Console.WriteLine("No available RingGroup member has been found.");
- _incomingCall.HangUp();
- }
- }
Expand|Select|Wrap|Line Numbers
- void OutgoingCallStateChanged(object sender, CallStateChangedArgs e)
- {
- var call = (IPhoneCall)sender;
- if (e.State == CallState.Answered)
- {
- Console.WriteLine("\nCall has been accepted by {0}.", call.DialInfo.Dialed);
- Console.WriteLine("Call from \"{0}\" is being transferred to \"{1}\".\n", _incomingCall.DialInfo.Dialed, call.DialInfo.Dialed);
- _incomingCall.AttendedTransfer(call);
- lock (_sync)
- {
- _calls.Remove(call);
- OnCompleted();
- }
- }
- if (e.State == CallState.Busy || e.State == CallState.Error)
- {
- lock (_sync)
- {
- if (call != null)
- {
- Console.WriteLine("Ringing phone number \"{0}\" ends.", call.DialInfo.Dialed);
- call.HangUp();
- _calls.Remove(call);
- CallSequencer();
- }
- }
- }
- }
Expand|Select|Wrap|Line Numbers
- void call_CallStateChanged(object sender, CallStateChangedArgs e)
- {
- if (e.State.IsCallEnded())
- {
- OnCompleted();
- }
- }
- void OnCompleted()
- {
- HangupOutgoingCalls();
- var handler = Completed;
- if (handler != null)
- handler(this, EventArgs.Empty);
- }
Expand|Select|Wrap|Line Numbers
- void HangupOutgoingCalls()
- {
- foreach (var call in _calls)
- {
- call.HangUp();
- }
- _calls.Clear();
- }
- void call_CallErrorOccured(object sender, VoIPEventArgs<CallError> e)
- {
- Console.WriteLine("Error occured at {0}: {1}", ((IPhoneCall)sender).DialInfo.Dialed, e.Item);
- var handler = CallErrorOccured;
- if (handler != null)
- handler(this, e);
- }
Test
Let’s run the application to test the ring group functionality of your new virtual softphone. Please note that some SIP accounts (whether they are desktop VoIP phones, softphones or mobile extensions) should be installed previously in your PBX to be able to add members to the ring group. For instance, I have registered three SIP accounts (1000, 2000, 3000) in my PBX. (Two will be a ring group member, and I use the third one to make a test call.)
After pressing F5, the previously written introduction can be seen in your console application. After the introduction, the application asks you to set up your SIP account (Figure 2).

Figure 2: The ring group as a console application after running it
Now you need to configure your virtual softphone and the ring group itself. First of all, set registration to required by entering „true” (Figure 3). After this, you need to create a new SIP account in your PBX that will be used as a virtual softphone extension for ring group purposes (in my case this is the „4000” numbered SIP account). Now provide the same SIP account details within your new console application by entering the required data. The domain name is the IP address of your PBX and the port number is its port number (that usually is 5060). After providing the necessary SIP account details, the application tries to register to the PBX. If the information provided is correct, the phone line state changes to RegistrationSucceeded. Thereafter, the application asks you to enter the number of the ring group members and to define a sequence. This order determines that which SIP account (that is which phone) will be ringing when someone dials the telephone number of the ring group. (The application will forward the incoming call to the first member. If that is unavailable, the call will be forwarded to the second member, etc.) Now the configuration is completed, the application is waiting for an incoming call (Figure 3).
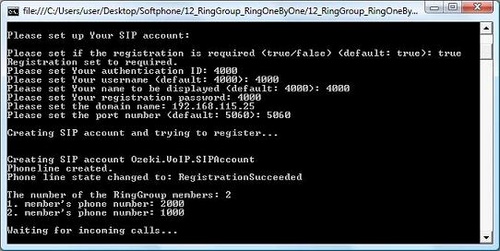
Figure 3: The ring group console application after running it
My test call can be seen below (Figure 4). I used „3000” to initiate a phone call. I dialled „4000” (that is the telephone number of the ring group – it can be function as a central phone number of a company). After this, the first ring group member, the „2000” numbered extension started to ring. However, this extension was busy, therefore the second member, „1000” started to ring. This extension accepted the call, so the incoming call has been transferred from „4000” (virtual softphone) to „1000” (desktop VoIP phone).
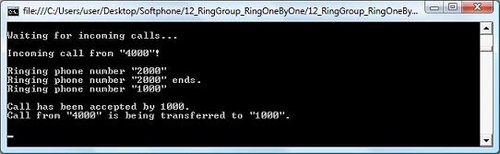
Figure 4: Test call
It means that your application works well! Congratulation for your success! :)
Conclusion
In todays accelerated world, companies need up-to-date software and hardware devices as well in all areas of business – so during the communication with customers and other partners, too. Call centers should be equipped with effective solutions that helps in automation. Call forwarding, ring group, call recording, call queuing, conference calling, etc. are just some of the great features that can be achieved if you use VoIP technology (and an IP PBX). In this tutorial I wanted to show through the example of ring groups how easy can be to develop a missing functionality on your own in order to improve your call center. I hope you liked it!
Further reading and references
To compose this C# tutorial on building a ring group I used the following knowledge base:
- http://en.wikipedia.org/wiki/Call_centre
- http://searchcrm.techtarget.com/definition/call-center
- http://www.imdb.com/title/tt1593756/...f_=tt_pv_mi_sm
- http://elderlymedicalalertsystems.co...-alert-systems
- http://en.wikipedia.org/wiki/Extension_%28telephone%29
- http://en.wikipedia.org/wiki/Call_transfer
- http://voip-sip-sdk.com/p_21-downloa...-sdk-voip.html